Now that you know how your business can benefit from using WordPress, you need to know how to set up your account and get started.
This tutorial will give you step-by-step instructions that will illustrate how to:
Create a WordPress account
Navigate to your dashboard
Create a new post
Create a new category
Change the theme of your blog
Log out of WordPress
Create a WordPress account
The first thing to remember is that there are two types of WordPress: WordPress.com and WordPress.org. WordPress.com is much easier to use and still gives the user plenty of flexibility, so let’s go to wordpress.com.
On the left-hand side of the page you’ll see this:
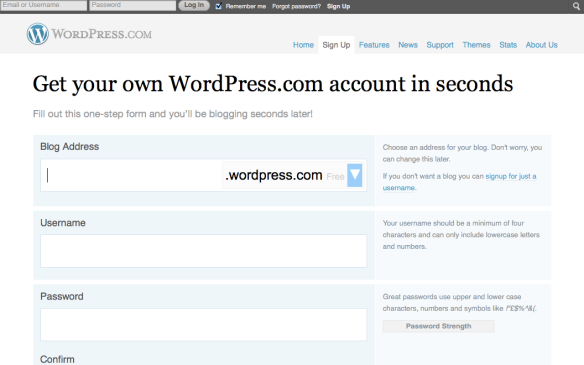
 Click ‘Get started here’ and you’ll be taken to a page that looks like this:
Here you’ll be asked to fill out a series of details. There are some instructions on the site next to each textbox, but let’s go through each of them one by one anyway.
First you’ll be asked for your blog address. This is the URL, or website address, for your blog. Either you can keep the “.wordpress.com” ending or you can click on the blue arrow and, for a small fee, choose a different ending for your blog’s URL.
You’ll also notice a link next to this entry that gives you the option of singing up for just a username, without a blog. This is useful if you simply want to read and comment on other people’s blogs. But you want a blog for your workplace, so let’s push on.
When you enter a blog address, WordPress will automatically check to make sure that address is available. If it’s not, the box will go red and WordPress will give you some suggestions for similar names that are available:
Either you can choose one of the suggestions at the bottom, or you can type in a new blog address. Note that only lowercase letters and numbers can be used.
When you choose a blog address that is available, you’ll get a little green tick, like this:
You’ll notice that WordPress is suggesting a different address that requires a fee of $18 a year. You can choose this if you like, or you can stick with the address you’ve chosen by clicking the link ‘No thanks, I’ll use the free address’, or by simply ignoring WordPress’s suggestion and moving on to the next textbox.
The next textbox asks you for your username. This, along with your password, is what you will use to sign in to your account and update your blog.
When you click in the textbox, WordPress will automatically suggest your blog address as your username and check for its availability. Your username doesn’t have to be the same as your blog address though; you can use whatever name you like, as long as it contains only lowercase letters and numbers.
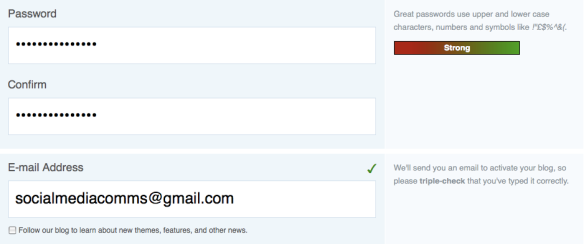
Then you’ll be asked for your password. As you type it in, WordPress will automatically assess the quality of your password. When you’re done, it will hopefully look something like this:
Next you’ll have to confirm your password. Don’t worry if the box goes red as you’re typing; it will go blue again once the passwords match up.
Next is your email address. Its important to get this right, as WordPress will need to email you before you can activate your blog. There is also a checkbox which you can click if you want to receive news from WordPress, but you don’t have to:
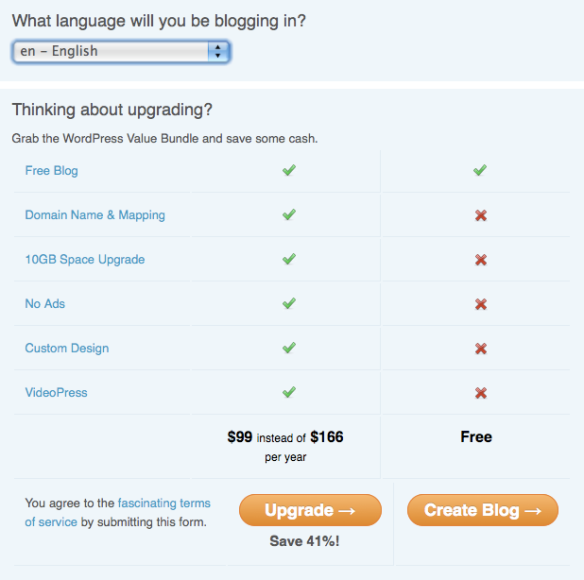
Then you can select the language your site will appear in (English is the default). After that, WordPress will give you the option of upgrading to receive more features. Don’t feel you have to do this; you can create a fantastic blog with the features that are available for free.
If you want to upgrade, click the ‘Upgrade’ button, but if you are happy with the free version, click ‘Create Blog’.
Once you click ‘Create Blog’, you will be taken to a page that begins like this:
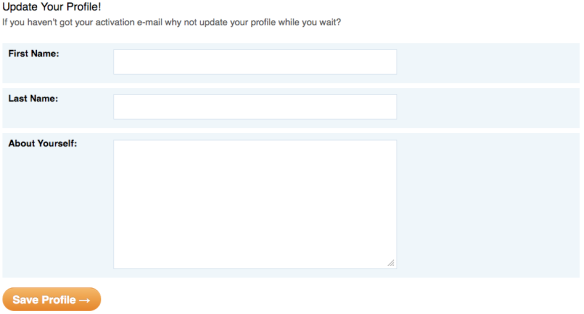
Pretty self-explanatory. While you wait for your email to come through, you can update your profile if you like:
You don’t have to do this now, but as the confirmation email can take some time to arrive, you might as well! No field is compulsory, so if you like you can enter the name of your business or organisation on one of the name sections, and enter a little profile of your workplace in the ‘About Yourself’ section.
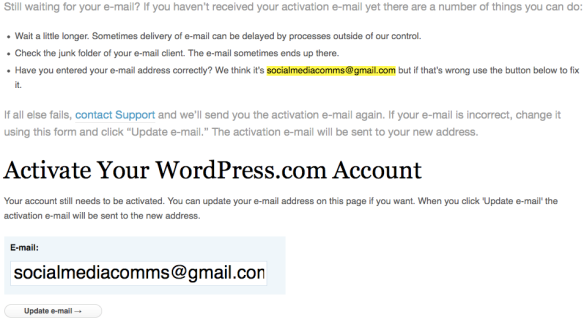
Further down the page, WordPress provides several suggestions in the event that you still haven’t received an email:
Hopefully you won’t need to know any of this information, but it’s there if you do.
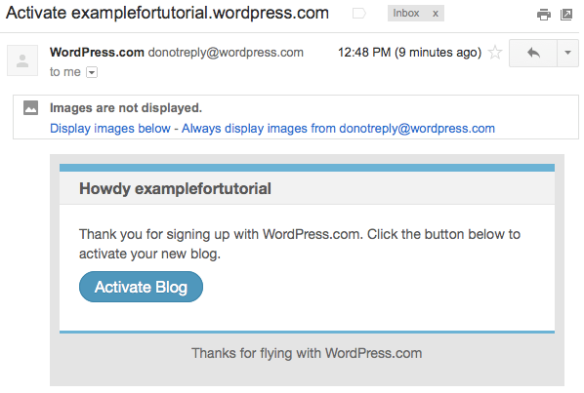
The next step is to check your email account for WordPress’s activation email. Mine appeared almost straight away, so you shouldn’t have to wait too long. When you open the email, you’ll see something like this:
The next step? You guessed it. Click ‘Activate Blog’!
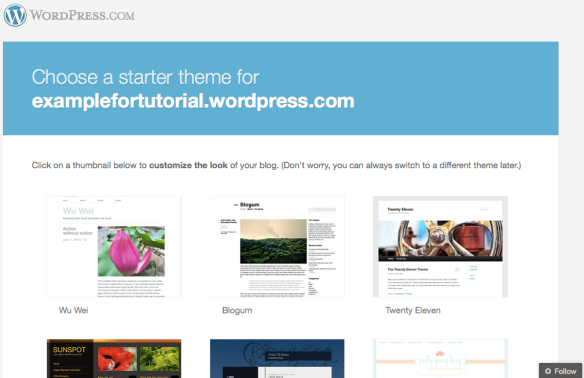
You’ll then be taken to a page that looks like this:
WordPress has many different “themes”, or looks. There are subtle differences between the themes in terms of what you can achieve with each one, so it’s worth clicking on a few different themes and reading about what they offer. Further down on the page is an option to browse more themes, which is worth doing as there are many to choose from. For now I’m going to choose “Twenty Eleven” (on the right-hand side of the above image).
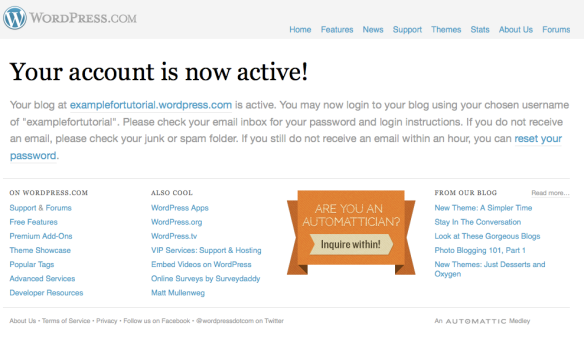
You should now be taken to a page that looks like this:
There’s a lot of information on this page but the most important bit is written in very big writing, which is helpful.
The next thing to do is to go to your homepage. In the grey header at the top of the page is a series of links; right in the middle of the page is a link called ‘Home’, so let’s click that.
Navigate to your dashboard
When you log in to your WordPress account (or when you click ‘Home’ if you’re following on from the previous section), you’ll be taken to a page that will look something like this:
You’ll notice that the ‘Freshly Pressed’ tab is currently selected (underneath the WordPress.com logo in the top left-hand corner). Two to the right from that tab is a tab called ‘My Blog’. Select it and you’ll see this:
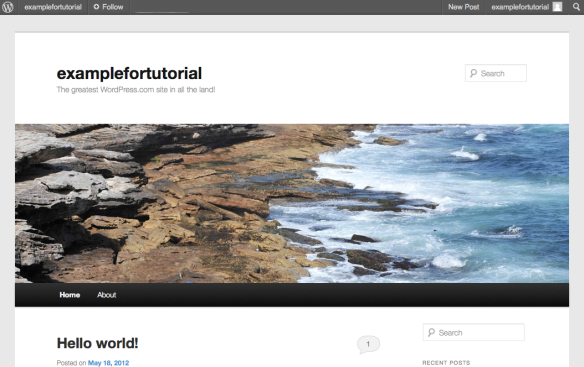
Click on the name of your blog (here it’s “examplefortutorial”) and you’ll be shown what your blog looks like to the world:
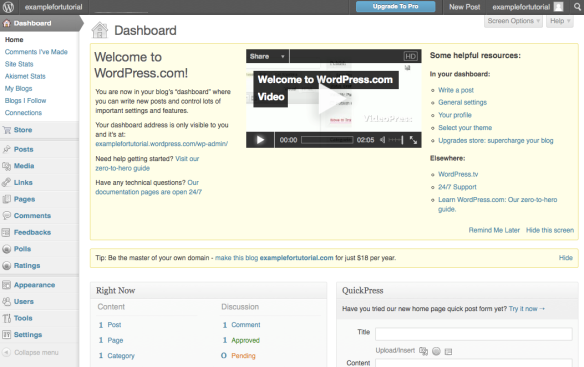
In the top left-hand corner of the page you’ll see the WordPress logo (a W in a circle), and next to it the name of your blog. Hover your mouse over it and a drop-down menu will appear. The first option is ‘Dashboard’, so let’s click on that:
Above is what your dashboard will look like. The dashboard is where you can update and customise your blog. Only you can see it and access it. From here you can create and update posts, change the look of your blog, and so much more. Below is how to use some of the dashboard’s most popular features, but the best way to get comfortable using it is to explore for yourself!
Create a new post
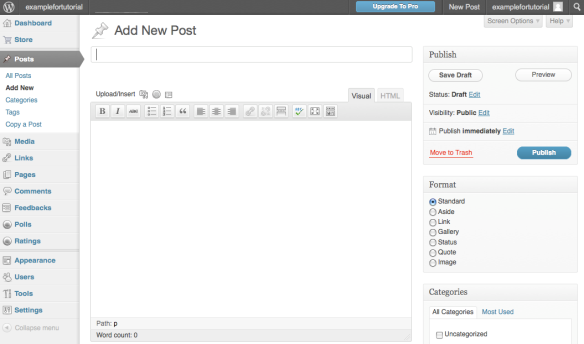
From the dashboard there are a couple of ways you can create a new post. Either you can hover your mouse over your blog’s name in the top left-hand corner, go to ‘New’ in the drop-down menu and select ‘Post’, or you can hover your mouse over ‘Posts’ in the menu on the left-hand side of the page and select ‘Add New’. Either way, you’ll be taken to this page:
The first textbox is where you write the title of your post, and in the large textbox below you can write your post.
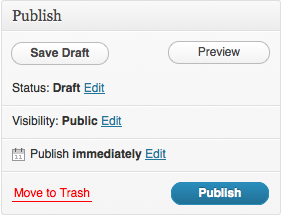
On the right-hand side is a box which gives you a few options. Let’s take a closer look:
While you’re writing, you can click ‘Save Draft’, which saves your progress. Then, if you’re not ready to publish your post just yet, you can exit the site and what you’ve written so far you can access again via the dashboard.
When you’ve finished writing (or before then, if you like), you can click ‘Preview’ and see what your post will look like on your blog before you publish it.
Alternatively, if you’re feeling brave, you can click ‘Publish’ and the post will appear on your blog. If you’re feeling tentative, don’t worry, you can change or delete posts later by clicking on the ‘Edit’ button next to a published post on your blog.
Create a new category
Categories are useful if you want to separate different types of posts. Any posts you make will automatically appear on your site’s homepage, but by creating categories you can group certain posts together in different pages on your site.
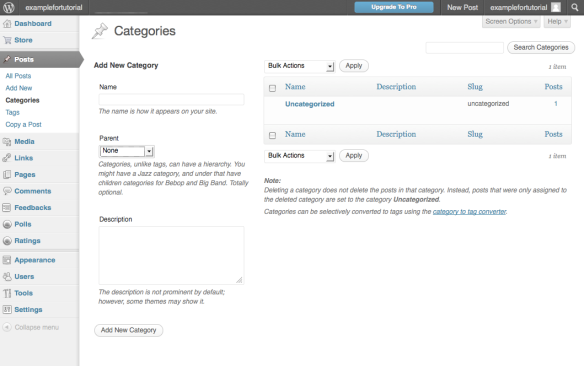
To create a category hover the mouse over ‘Posts’ on the left-hand menu and select ‘Categories’. You will be taken to this page:
Here you can enter the name of your new category into the ‘Name’ textbox. If you want it to be a subcategory of a category you have already made, you can select that category from the drop-down menu under ‘Parent’. Then, if you like, you can give a description of your category in the ‘Description’ textbox.
Now when you create a new post, you can select which category you want your post to appear in by selecting the relevant checkbox in the ‘Categories’ box on the right-hand side of the ‘Add New Post’ page. You can select more than one category.
To see your categories in action, click your blog’s name in the top left-hand corner of the dashboard. You will be taken to your blog, where you will see your categories listed on the menu in the header.
Change the theme of your blog
As mentioned above, WordPress.com has a wide variety of different themes which change the look and feel of your blog. To change to a different theme from your dashboard, hover your mouse over ‘Appearance’ in the left-hand menu and select ‘Themes’. Then scroll through the many different options and choose the theme to suit your blog. You can click on any theme to read more about it before you commit to it.
Log out of WordPress
To log out of your blog, hover the mouse over your username in the top right-hand corner of the page, then select ‘Sign Out’. Alternatively, if you have more than one blog registered to your username, you can select ‘Manage My Blogs’ to select a different blog.
If you would like to know more about WordPress or have a specific WordPress query you would like answered, please submit your questions to us via the Social Media at Work – Contact Us page.
In the meantime, you may be interested in discovering more about WordPress and accompanying social media platforms by visiting the Social Media at Work Forum.

