This guide will give you step-by-step instructions on how to:
Create a Facebook account
Create a Facebook page for your organisation
Edit your profile
Administer your page
Post on your wall
Upload images
Connect with people
Advanced business features
Facebook Insights
This guide will primarily deal with using Facebook functionality through the page you created for your organisation, so it may be slightly different to what you’re used to on your personal Facebook page.
Create your Facebook account
To create a Facebook page for your business or organisation, you’ll need an individual Facebook profile so you can create and moderate it. If you already have a Facebook profile, you can skip straight to creating a page for your organisation.
To create an account, go to www.facebook.com.
Underneath ‘Sign Up’, you’ll see seven fields to fill out.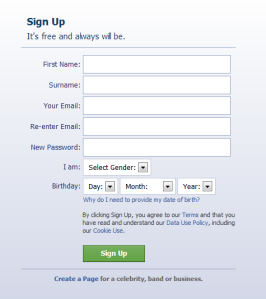
If you’re wondering why it requires date of birth and gender information, Facebook likes you to provide this to encourage authenticity – making sure that Facebook users are real people.
Fill these out and click ‘Sign Up’. You’ll be taken to the getting started pages.
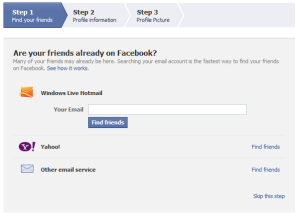
Step 1 invites you to fill in your email address so Facebook can find your email contacts who are already on Facebook, and add them to your friends list.
You can skip this step by clicking ‘Skip this step’, located at the bottom of the window. Don’t worry, because you can add your email contacts on Facebook at any time.
If you do want to add your email contacts, fill out the fields in the window and click ‘Find Friends’. If you have a Yahoo or Windows Live/Hotmail address, simply type in your email address and password and your email contacts with Facebook profiles will be automatically added.
If you have an email account with a different service, you can still type in your details into the ‘Other email service’ tab. It may be a little slower in adding your friends.
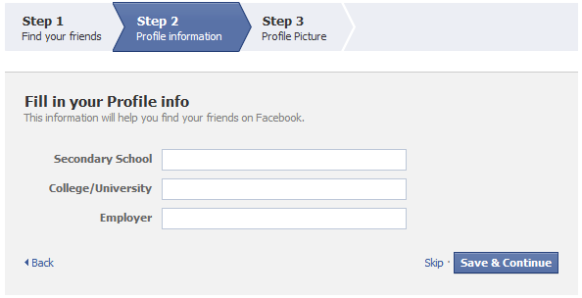
Completing or skipping this step will take you to Step 2, the ‘Profile Information’ window. You can fill out your secondary school, tertiary education and employer information in these fields.
If you start typing, you’ll notice a drop-down list of options. You may find your school, university or employer come up as you continue typing. If you do find your institution, it will add you to that network. This makes it easier for you to find your friends. Once you are finished, click ‘Save & Continue’.
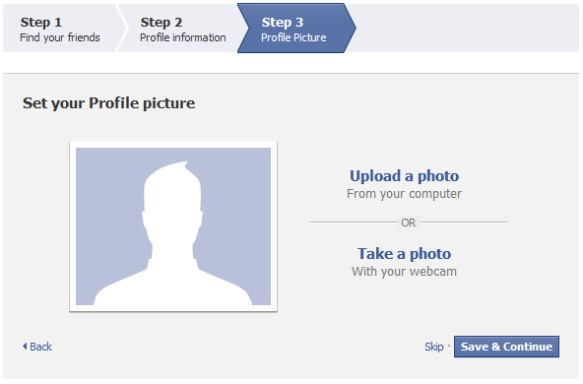
Step 3 is adding a profile picture. You can take one from your webcam (if you have one) or upload a file from your computer. Clicking ‘Upload a photo’ will bring up a ‘Choose File’ option. Select the file from the location on your computer and click ‘Upload’, and your profile picture will be uploaded.
Clicking ‘Take a photo with webcam’ will allow you to take a picture instantly using your webcam.
Once you’ve done this, click ‘Save & continue’.
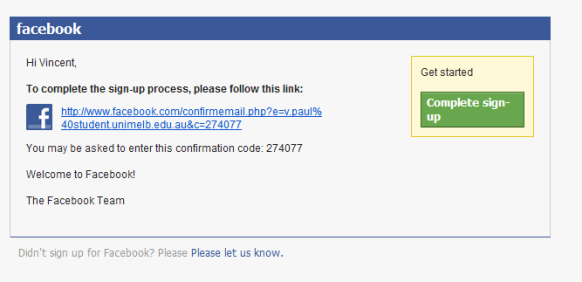
You will then be asked to go to your email inbox and confirm your Facebook account.
Log onto your email and open the email from Facebook, and click the link to confirm your account.
Once you’ve done this, you can start using Facebook!
Create a Facebook page for your organisation
Open your browser and go to www.facebook.com/pages/create.php.
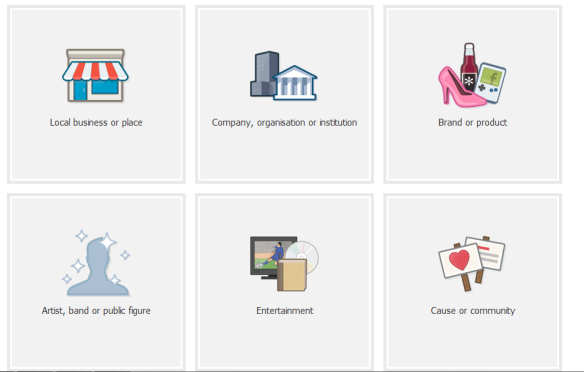
You’ll see a page with six boxes of different options for you page. Depending on what type of organization you are, choose one of the boxes.
Once you click on a box, you’ll be asked to fill out some details regarding your business. The information varies depending on which type of page you select, so fill in the required fields.
The name field will be the title of your Facebook page, so make sure it’s correct. Tick the ‘Agree to terms’ box, then click ‘Get started’.
This will take you to a three-step page for filling out some basic information on your page. These are all skip-able, so you can fill them out later if you wish.
Step 1 is choosing a profile picture. This can be taken from your webcam, but it is probably wise to choose an image that has been specifically made for the Facebook page and reflects your company, such as a logo. Once you’ve uploaded your image, click ‘Save photo’.
You’ll move on to Step 2, which is the ‘About’ section. Enter some information about your page, and if you have a website, enter your link in the box provided. You can also add multiple links, such as Twitter, LinkedIn, and other sites. Click ‘Save Info’ to move to Step 3.
This step will create your unique Facebook page web address. This is a direct address, for example http://www.facebook.com/pages/Working-with-Social-Media/379458338772510. However, be careful because once you click ‘Set Address’, it can’t be changed.
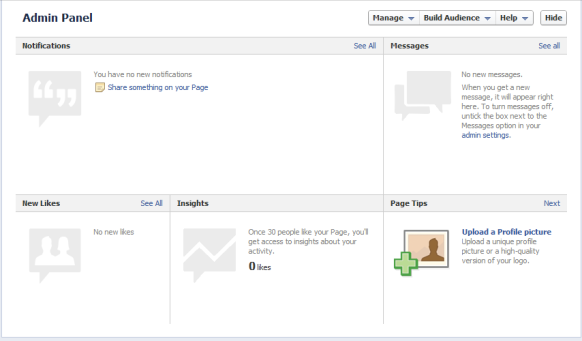
Once you completed these steps, you’ll be taken to your page’s admin panel.
The Admin Panel is where you can edit your page and profile. The ‘Notifications’ panel is where any notifications about messages, friend requests, posts, comments, likes, or anything that goes on with your page appears. You can add a post directly to your page by clicking ‘Share something on your page’.
The ‘Messages’ panel is where your messages are displayed. You can send messages or check your received messages from here.
The ‘New Likes’ panel shows the new likes your page is getting. You can track who and how many new people are liking your page.
The ‘Insights’ panel is Facebook’s version of site statistics. You can access it once your page gets 30 likes. This makes a handy number goal to aim for when you first make a Facebook page.
Insights gives you access to a number of handy metrics that measure the activity on your page and how it’s changed over time. It can all be exported to Microsoft Excel, which makes analysing the data even easier. However, it can be fairly complex, so details about Facebook Insights are in Advanced Facebook Business Tips.
Edit your Facebook Page’s Profile
In the bottom-right-hand corner of the page, you can click ‘Upload a Profile Picture’ to choose a picture from your computer or take a webcam image.
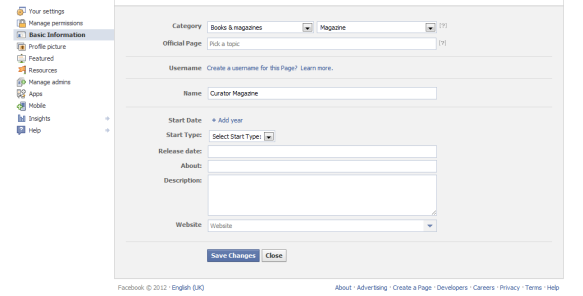
Click on the ‘Manage’ tab, and then click ‘Edit Page’ from the dropdown menu to go to your Profile Settings page.
Click the ‘Basic Information’ tab on the left to edit your name, description, company info, category, username, website and about section.
Click ‘Profile Picture’ to change your profile picture.
You can add a cover image by clicking ‘Add a Cover’, at the top of your Facebook Page. If you add a cover, make sure to choose a high-resolution image that is wide enough to fit without stretching the image. You can always crop it down and adjust it, but Facebook will automatically fit the image. So, if it’s too small it will stretch and distort, resulting in an unprofessional look.
Clicking the ‘View Page’ button at the top will take you to a view of your updated Facebook page, so you can see the changes.
Administer your Facebook Page
In the Profile Settings page, you’ll see ‘Your Settings’, ‘Manage Permissions’, ‘Resources’, and ‘Manage Admins’.
In ‘Your Settings’ you can change your posting preferences to always post on your Facebook page as the company, instead of your personal admin profile.
You can also add email notifications for things happening on your page.
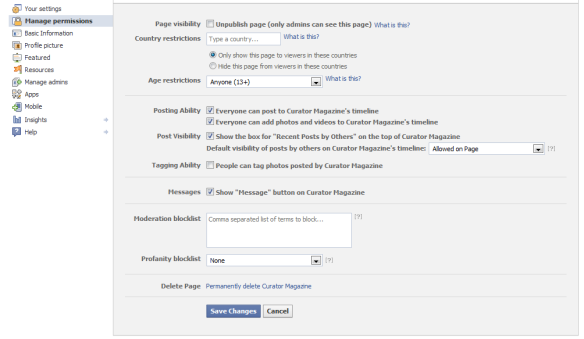
If you want to change the privacy settings, who can post on your page, or what is visible to people on your page, click ‘Manage Permissions’.
A particularly handy feature is Moderation blocklist, which is a blacklist of words that can’t be used on your page in any way. If a user posts with one of these words, it will automatically be flagged as spam and deleted. To add, words, simply click the box and type the words, separated by commas. You can add any words you like, such as swear words, or brand-specific words.
Another useful feature is the Profanity blocklist, which can be set to none, medium or strong. Facebook will block the words that have been marked as offensive by the community. This means these words can’t be posted to your Facebook page.
You can also adjust who can see your page, who can post on your page, which countries can view your page, who can tag in photos you’ve posted on your page, if people can send private messages to your page, and age restrictions for your page. You can also permanently delete your page (if you wish to) by clicking ‘Permanently delete this page’.
Under the ‘Resources’ tab, there are resources to help you manage your page and plan your Facebook strategy.
You can also add new Facebook page administrators in the ‘Manage admins’ tab. It can be helpful to have multiple admins sharing the load of updating your page with regular posts.
You can also edit the settings of the Apps on your page, by clicking the ‘Apps’ tab.
Post on your Facebook Page’s wall
On your page’s admin panel, you can click ‘Share something on your Page’, in the notifications panel. This will take you to your Page, where you can click in the posting box to share a status update, photo/video, or event/milestone. You can’t choose the visibility settings, because Facebook Pages for organisations are supposed to be public.
Once you’ve typed a status, click ‘Post’, and it will appear on your Page.
Upload images to your Facebook Page
Simply click ‘Photo/Video’ when you post something and you can choose to upload an image from your computer, take one from your webcam, or create a photo album.
Creating a photo album allows you to select an entire folder from your computer to upload as a photo album. Select the folder from your computer, and name your album in the next window.
You can access your photos and albums on the right hand side of your Page, near the information/about section.
Connect with people on your Facebook Page
The goal of your Facebook Page is to attract people to like your page. You can’t make people like your page through Facebook. You can’t send individuals requests because that could easily be used for spam. The only way to do it is to drum up interest via other methods, such as your own website, Twitter, or your personal Facebook profile. The best method is to alert people to your Facebook presence so they can like it.
When you launch, you will have zero likes. To get the ball rolling with some initial likes, you can invite your email contacts to like your page. This will send them an email, inviting them to like your page.
On your Admin Panel, click ‘Build Audience’, and then ‘Invite email contacts’, and choose your email service from the menu. Enter your details, and the emails will be sent. Hopefully, this will get the first few people to like your page.
Advanced business features on your Facebook Page
Advertisements
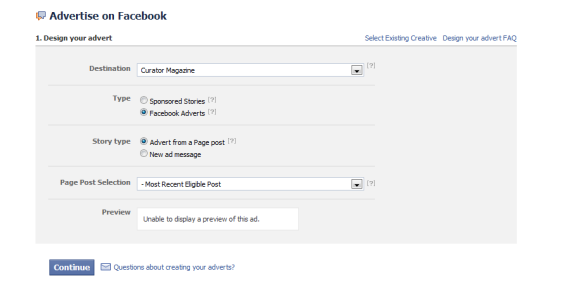
You can create ads for your page that are displayed on Facebook’s ad space. Click ‘Build audience’ on your Admin Panel, and select Create advertisement.
You can choose different options for your ad. If you want to increase the likes on your Facebook Page, select your Facebook page under the ‘Destination’ category. You can also choose an external website, if you want people to be directed there.
You can create an ad from a pre-existing post on your Page, or you can create a new ad. If you decide to create one from a post, you can select the most recent post, or choose one yourself.
If you want to insert custom text, click ‘New ad message’, and you can create your own text and images for the ad.
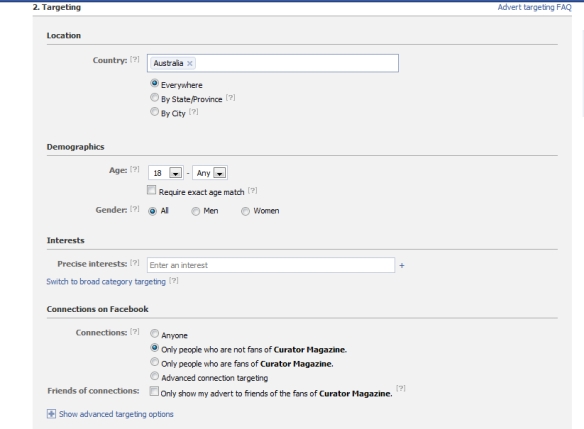
The next step is choosing how and where your ad is displayed. You can select countries, states and cities, as well as specific demographics such as age and gender. You can choose to target specific interests as well, so for example if you are running an online store for snow equipment, you can target people who list snowboarding as an interest.
Targeting options include relationship status, gender interest, languages, education and work experience.
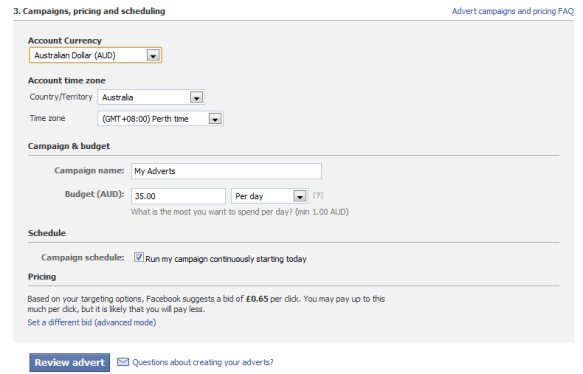
The third set of options is pricing and duration. You can choose your currency, time zone, budget (per day), duration and pricing (per click).
Facebook Insights
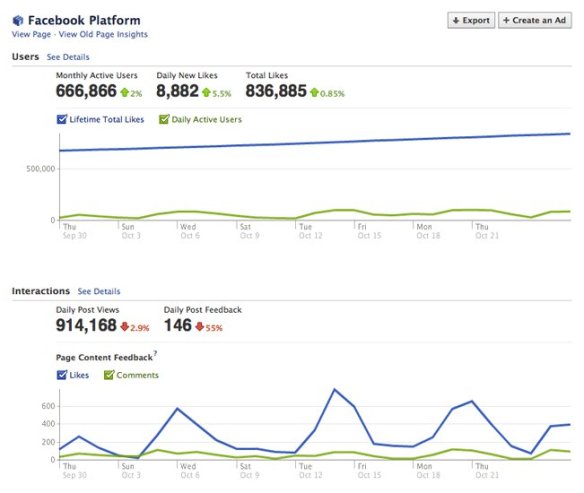
Facebook Insights are traffic statistics for your Facebook Page. You can access these tools once your page has 30 likes. It can be exported straight to Microsoft Excel, for easy analysis and graphing of day-to-day statistics. But there are many categories and a lot of information comes out.
Some of the key categories to focus on are Lifetime Total Likes, which tells you how many likes you have in total (daily), and Page Consumers and Page Consumption, which tells you how (or if) your content is being consumed.
If you’re interested in expanding your reach or seeing who your audience is, it’s useful to keep track of Friends of Fans, which tracks the people who may see your interactions in the feed of their friends’ activity. It can also be worthwhile tracking Reach, which is the number of people who have seen your content in a newsfeed, on your page
If you would like to know more about Facebook or have a specific Facebook query you would like answered, please submit your questions to us via the Social Media at Work – Contact Us page.
In the meantime, you may be interested in discovering more about Facebook by visiting our Social Media at Work Forum.

